
Taco Kit Instructions: A Comprehensive Guide
Unleash your inner chef with this comprehensive guide to taco kit success! From prepping ingredients to assembling perfect tacos‚ we will provide you with the information necessary. Follow our step-by-step directions and tips for an authentic and delicious taco experience every time.
Understanding Your Taco Kit Contents
Before embarking on your taco-making adventure‚ familiarizing yourself with the contents of your taco kit is a crucial first step. Most kits typically include taco shells (either hard or soft)‚ a seasoning mix for the meat‚ and taco sauce. Some kits may also contain flour tortillas‚ offering the flexibility to create both hard and soft tacos.
Carefully examine the packaging to identify each component. Pay attention to any specific instructions or recommendations provided by the manufacturer regarding the use of each item. Note the expiration dates to ensure freshness and quality.
Hard taco shells are usually pre-formed and ready to fill‚ while soft tortillas may require warming before use. The seasoning mix is designed to infuse your ground beef with authentic taco flavor‚ and the taco sauce adds a tangy‚ zesty finish.
By understanding the contents of your taco kit‚ you’ll be well-equipped to follow the instructions and create a delicious and satisfying meal.
Essential Ingredients Beyond the Kit
While taco kits provide the core elements for a quick and easy taco night‚ adding a few fresh ingredients can elevate your meal to a culinary masterpiece. Ground beef is the most common addition‚ providing a savory base for your tacos. However‚ you can experiment with other protein options like shredded chicken‚ ground turkey‚ or even plant-based alternatives for a vegetarian twist.
Beyond the protein‚ consider incorporating a variety of toppings to customize your tacos to your liking. Shredded lettuce adds a crisp‚ refreshing element‚ while diced tomatoes offer a burst of juicy sweetness. Shredded cheese‚ such as cheddar or Monterey Jack‚ provides a melty‚ savory complement to the other ingredients.
Other popular toppings include sour cream‚ guacamole‚ salsa‚ and chopped onions. These additions not only enhance the flavor but also contribute to the overall texture and visual appeal of your tacos. Don’t be afraid to get creative and experiment with your own favorite toppings to create a truly personalized taco experience.
Preparing the Ground Beef
The foundation of a great taco often lies in the preparation of the ground beef; Start by selecting a lean ground beef with a fat content of around 80/20. This will provide flavor without excessive grease. In a large skillet‚ brown the ground beef over medium-high heat‚ breaking it apart with a spoon or spatula as it cooks. This process typically takes about 5-7 minutes.
Once the beef is fully browned‚ drain off any excess grease to prevent your tacos from becoming soggy. Use a colander or carefully pour the grease into a heat-safe container‚ avoiding splatters. After draining‚ return the beef to the skillet and proceed with seasoning.
Ensure the beef is evenly cooked and broken into small pieces for easy filling. Proper browning and draining are crucial steps in achieving the desired texture and flavor for your taco filling. These techniques will ensure that the meat is safe to consume and contribute to an enjoyable taco-eating experience.
Seasoning the Meat: Achieving the Perfect Flavor
Once the ground beef is browned and drained‚ it’s time to infuse it with the vibrant flavors that define a delicious taco. Most taco kits include a pre-made seasoning packet‚ which simplifies the process. Open the seasoning packet and sprinkle it evenly over the cooked ground beef in the skillet; For enhanced flavor‚ consider adding a pinch of cumin or chili powder.
Next‚ add water as indicated on the taco seasoning packet instructions‚ typically about 2/3 to 3/4 cup. Stir well to ensure the seasoning is evenly distributed throughout the meat. Bring the mixture to a boil‚ then reduce the heat to low and simmer‚ uncovered‚ for approximately 3-4 minutes‚ stirring occasionally.
Simmering allows the flavors to meld together and the sauce to thicken‚ creating a rich and aromatic taco filling. Taste the meat and adjust the seasoning as needed. If you prefer a spicier taco‚ add a dash of hot sauce or a pinch of cayenne pepper. Achieving the perfect flavor balance is key to a satisfying taco experience‚ so don’t hesitate to experiment with different seasonings to suit your taste preferences.
Warming Taco Shells: Oven vs. Microwave
Warming taco shells is a crucial step in achieving the ideal texture and preventing breakage. The two most common methods are using an oven or a microwave‚ each offering distinct advantages. For crispy and flavorful shells‚ the oven is the preferred choice. Preheat your oven to 325°F (160°C). Arrange the taco shells on a baking sheet‚ overlapping them slightly to prevent them from falling over. Bake for 6-7 minutes‚ or until they are crisp and heated through.
Microwaving is a faster option‚ but it can result in softer shells. To microwave‚ remove the taco shells from their packaging and place them on a microwave-safe plate. Fan them out in a circular shape‚ overlapping the edges slightly. Microwave on high for 30-45 seconds‚ until warm.
Regardless of the method chosen‚ it’s essential to monitor the shells closely to prevent burning or over-drying. Once warmed‚ taco shells should be handled with care to avoid breakage during assembly. If you are using hard shells‚ this is very important to remember!
Heating Flour Tortillas: Methods and Tips
Heating flour tortillas enhances their flexibility and flavor‚ making them perfect for soft tacos. Several methods can be used‚ each offering varying degrees of convenience and results. A skillet or griddle is an excellent option for achieving slightly charred and pliable tortillas. Heat a dry skillet or griddle over medium heat. Place one tortilla at a time in the hot skillet for about 15-30 seconds per side‚ until it becomes warm and slightly browned. Be sure to flip to prevent burning.
Microwaving is a quick and easy method‚ suitable for heating multiple tortillas at once. Stack the tortillas on a microwave-safe plate and cover them with a damp paper towel. Microwave on high for 30-60 seconds‚ depending on the quantity. The damp paper towel helps to retain moisture and prevent the tortillas from drying out.
For a larger batch‚ the oven can be used. Wrap the tortillas in foil and bake at 325°F (160°C) for 10 minutes‚ or until warm. Regardless of the method‚ ensure that the tortillas are pliable and not overly heated‚ which can cause them to become stiff or brittle.
Assembling Hard Shell Tacos: Preventing Breakage

Assembling hard shell tacos can be a delightful‚ albeit sometimes challenging‚ experience. The key to enjoying these crunchy delights lies in preventing the shells from breaking during the filling process. One effective strategy is to warm the taco shells slightly before adding the ingredients. This can be done in the oven at a low temperature (around 325°F or 160°C) for a few minutes‚ which makes them less brittle.
When filling the shells‚ start with a layer of cheese or beans at the bottom. These act as a barrier‚ preventing the moist ingredients from directly contacting the shell and causing it to soften and break. Distribute the filling evenly to maintain balance and structural integrity. Avoid overfilling the tacos‚ as this puts additional stress on the shell.
Another useful tip is to use a taco holder or stand. These handy tools keep the tacos upright‚ reducing the risk of them tipping over and cracking. Handle the filled tacos gently and serve them immediately to minimize the chance of breakage. With a little care and attention‚ you can enjoy perfectly assembled hard shell tacos every time.
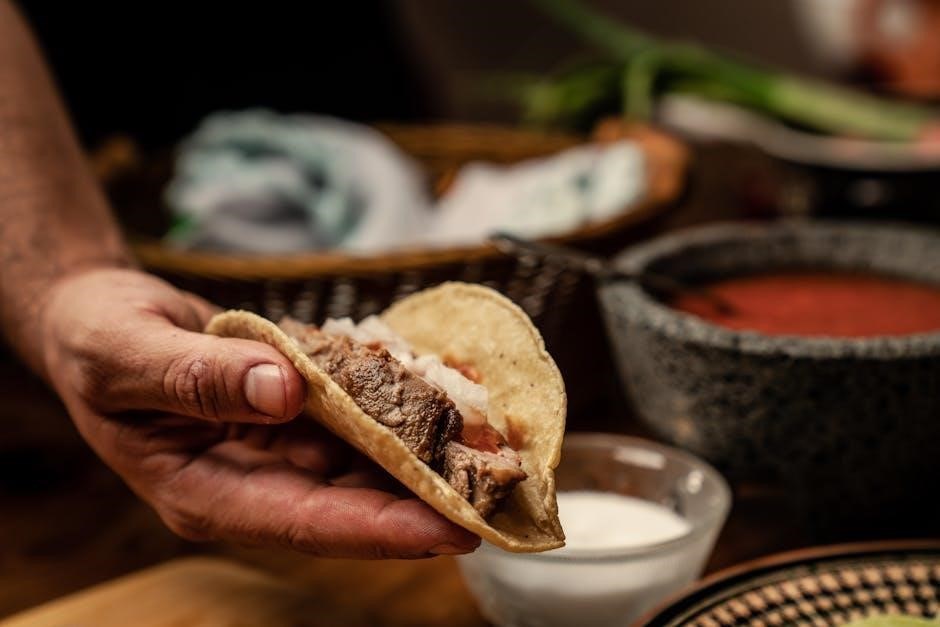
Assembling Soft Tacos: Techniques for a Sturdy Taco
Creating a sturdy soft taco is essential for a satisfying and mess-free eating experience. The key to achieving this lies in the layering and folding techniques used during assembly. Start by warming the tortillas slightly to make them more pliable and less prone to tearing. A quick pass over a hot skillet or a brief stint in the microwave will do the trick.
When adding fillings‚ begin with a base layer of beans or rice. These ingredients help to absorb excess moisture and prevent the tortilla from becoming soggy. Next‚ add the seasoned meat‚ followed by your choice of toppings such as shredded lettuce‚ diced tomatoes‚ and cheese. Avoid overfilling the tortilla‚ as this can make it difficult to fold and more likely to burst.
To fold the taco‚ bring one side of the tortilla over the filling‚ creating a semi-circular shape. For added stability‚ consider using a toothpick to secure the fold. Alternatively‚ you can fold the bottom of the tortilla up slightly to create a sealed pocket. Serve immediately and enjoy your perfectly assembled‚ sturdy soft tacos!
Adding Toppings: A Guide to Common and Creative Options

Toppings are the heart and soul of any great taco‚ offering a chance to personalize your meal and elevate the flavor profile. While classic options like shredded lettuce‚ diced tomatoes‚ and shredded cheese are always a hit‚ don’t be afraid to explore more creative additions. Consider adding a dollop of sour cream or Greek yogurt for a tangy coolness that complements the spicy meat.
For a burst of freshness‚ try incorporating ingredients like chopped cilantro‚ diced onions‚ or a vibrant salsa. Pickled onions or jalapeños can add a tangy and spicy kick‚ while sliced avocado or guacamole provides a creamy richness. Corn kernels‚ black beans‚ or bell peppers can also be added for texture and flavor.
If you’re feeling adventurous‚ experiment with unconventional toppings like crumbled bacon‚ grilled pineapple‚ or even a drizzle of honey. The possibilities are endless‚ so let your taste buds guide you and create a taco masterpiece that is uniquely your own. Remember that your taco kit offers you a variety of options.
Taco Sauce Application: Enhancing the Flavor Profile
Taco sauce is the finishing touch that brings all the flavors of your taco together. It’s more than just a condiment; it’s a key component that enhances the overall flavor profile. The right amount of taco sauce can elevate your taco from good to great‚ adding a zingy‚ spicy‚ or tangy element that complements the meat‚ toppings‚ and shell.

When applying taco sauce‚ consider the type of taco you’re making. For hard shell tacos‚ a drizzle of sauce along the bottom can help prevent the shell from breaking‚ while for soft tacos‚ a more generous application can add moisture and flavor to every bite. Start with a small amount and add more to taste‚ as taco sauces can vary in heat level.
If you’re using multiple toppings‚ think about how the taco sauce will interact with each one. A mild sauce might be best for tacos with a lot of fresh ingredients‚ while a spicier sauce can stand up to richer toppings like sour cream or guacamole. Consider the quality of your taco sauce for the best flavor.
Adapting Instructions for Different Taco Kits
Taco kits offer a convenient way to enjoy tacos at home‚ but not all kits are created equal. Each brand and variety may have slightly different instructions‚ ingredients‚ and components. It’s essential to adapt your approach based on the specific kit you’re using to ensure the best possible outcome.
Start by carefully reading the instructions provided on the packaging. Pay attention to the recommended cooking times for the meat‚ heating instructions for the shells or tortillas‚ and any specific guidelines for using the included seasoning or sauce. Note any variations in ingredient quantities or preparation steps compared to standard taco recipes.
Consider the type of shells or tortillas included in the kit. Hard shells may require baking to achieve optimal crispness‚ while soft tortillas might benefit from a quick warm-up in a skillet or microwave. Adjust the heating time accordingly to prevent burning or drying out.
If the kit includes a seasoning packet‚ follow the instructions for mixing it with the meat and water. Taste the meat after cooking and adjust the seasoning if needed. If the kit includes taco sauce‚ consider its heat level and flavor profile when adding it to your tacos. If the kit is for a special type of taco like Birria‚ follow the instructions for that specific style.
Troubleshooting Common Taco Kit Issues
Even with the best instructions‚ taco kit mishaps can occur. Here’s how to troubleshoot some common problems.
Broken Taco Shells: Hard taco shells are prone to breakage. To minimize this‚ warm them gently in the oven or microwave before filling. Avoid overfilling‚ and handle them carefully during assembly.
Dry or Bland Meat: If the meat seems dry‚ add a splash of water or broth while cooking. If it lacks flavor‚ consider adding extra taco seasoning or your favorite spices.
Soggy Tortillas: To prevent tortillas from becoming soggy‚ warm them just before filling. Avoid overfilling‚ and use a slotted spoon to drain excess liquid from the meat.
Uneven Heating: Microwaves can heat tortillas unevenly. For more consistent results‚ warm them in a dry skillet over medium heat.
Flavor Imbalance: If the taco sauce is too spicy‚ temper it with sour cream or guacamole. If it’s too bland‚ add a pinch of chili powder or a squeeze of lime juice.
Shells Falling Apart: Secure the base of hard taco shells with a small piece of lettuce or cheese to prevent them from crumbling.
Serving and Storage Suggestions
Maximize your taco enjoyment with these serving and storage tips.
Serving Suggestions: Arrange your assembled tacos on a platter for an appealing presentation. Offer a variety of toppings in separate bowls so guests can customize their tacos. Consider serving your tacos with sides like Mexican rice‚ refried beans‚ or a fresh salad.
Immediate Consumption: Tacos are best enjoyed immediately after assembly to prevent the shells from becoming soggy or the ingredients from losing their freshness.
Short-Term Storage: If you have leftover assembled tacos‚ wrap them individually in foil or plastic wrap and refrigerate them for up to 24 hours. Reheat gently in the oven or microwave before serving.
Ingredient Storage: Store leftover cooked meat in an airtight container in the refrigerator for up to 3 days. Keep unused taco shells and tortillas in their original packaging or in a resealable bag to prevent them from drying out.
Topping Storage: Store cut vegetables and other toppings in separate airtight containers in the refrigerator to maintain their freshness and prevent cross-contamination.